Beanies? Yes, Beanies with an S! Here are 4 types of Jack O’Lanterns for you to make with your beanie!
The Basic Jack O’Lantern

Stitches used:
ch- chain
sc – single crochet
dc – double crochet
2dctog – link 2 dc together
sl st – slip stitch
st – stitch
Using size 4 yarn (worsted or medium weight yarn) with a J-10 (6.0 mm) needle to make a beanie 7” high and 15” flat diameter.
Using ORANGE, Ch 4 and loop to make a magic ring.
Row 1 – ch 2 (this counts as your first dc of this row) and then 11 dc into the ring. Join with sl st to first dc (12 dc)
Row 2 – ch 2 (this counts as your first dc of this row), dc in the same st as joining, and then 2 dc in each stitch all the way around to end. Join with sl st to first dc. (24 dc)
Row 3 – ch 2 (this counts as your first dc of this row), dc in same st as joining, dc in the next st, then repeat {2 dc in the next st, dc in the next st} to the end. Join with sl st to first dc. (36 dc)
Row 4 – ch 2 (this counts as your first dc of this row), dc in same st as joining, dc in the next 3 st, then repeat {2 dc in the next st, dc in the next 4 st, 2 dc in the next st dc in the next 3 st} to the end. Join with sl st to first dc (44 dc).
Row 5 – ch 2 (this counts as your first dc of this row), dc in each st all the way around to the end. Join with sl st to first dc. (44 dc)
Row 6-10 – repeat row 5 (44 dc)
Row 11 – ch 1 (this counts as your first sc of the row), sc in each stitch all the way around to the end. Join with st to the first sc and fasten off. (44 dc)
Putting it together:
- Cut out face pieces with felt – 3 triangles (for eyes and nose) and a mouth
- Glue eyes between rows 5-6
- Glue nose at row 6
- Glue mouth at row 9
Happy Crocheting! Wear with HOPE and be warmed by LOVE
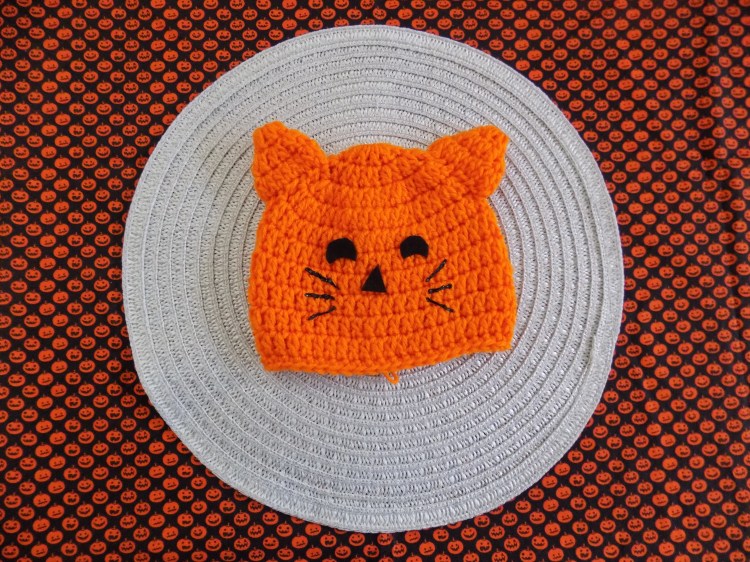
Jack O’Lantern Kitty
Stitches used:
ch- chain
sc – single crochet
dc – double crochet
2dctog – link 2 dc together
sl st – slip stitch
st – stitch
Using size 4 yarn (worsted or medium weight yarn) with a J-10 (6.0 mm) needle to make a beanie 7” high and 15” flat diameter.
Using ORANGE, Ch 4 and loop to make a magic ring.
Row 1 – ch 2 (this counts as your first dc of this row) and then 11 dc into the ring. Join with sl st to first dc (12 dc)
Row 2 – ch 2 (this counts as your first dc of this row), dc in the same st as joining, and then 2 dc in each stitch all the way around to end. Join with sl st to first dc. (24 dc)
Row 3 – ch 2 (this counts as your first dc of this row), dc in same st as joining, dc in the next st, then repeat {2 dc in the next st, dc in the next st} to the end. Join with sl st to first dc. (36 dc)
Row 4 – ch 2 (this counts as your first dc of this row), dc in same st as joining, dc in the next 3 st, then repeat {2 dc in the next st, dc in the next 4 st, 2 dc in the next st dc in the next 3 st} to the end. Join with sl st to first dc (44 dc).
Row 5 – ch 2 (this counts as your first dc of this row), dc in each st all the way around to the end. Join with sl st to first dc. (44 dc)
Row 6-10 – repeat row 5 (44 dc)
Row 11 – ch 1 (this counts as your first sc of the row), sc in each stitch all the way around to the end. Join with st to the first sc and fasten off. (44 dc)
EARS (make 2)
In ORANGE, Ch 4 and loop to make a magic ring.
Row 1 – ch 2 (this counts as your first dc of this row) and then 5 dc into the ring. Join with sl st to first dc (6 dc)
Row 2 – ch 2 (this counts as your first dc of this row), then repeat {2 dc in the next st} all the way around to the end. Join with sl st to first dc. (12 dc)
Row 3 – ch 2 (this counts as your first dc of this row), dc in same st as joining, dc in the next st, then repeat {2 dc in the next st, dc in the next st} to the end. Join with sl st to first dc. Fasten off and leave a long strand for sewing. (18 dc)
Putting it together:
- Cut out face pieces with felt – 2 crescents (for eyes), 1 triangle (for nose)
- Glue eyes between rows 5-6
- Glue nose at row 6-7
- Puffy paint whiskers between rows 7-9
- Sew ears at rows 3-5
Happy Crocheting! Wear with HOPE and be warmed by LOVE
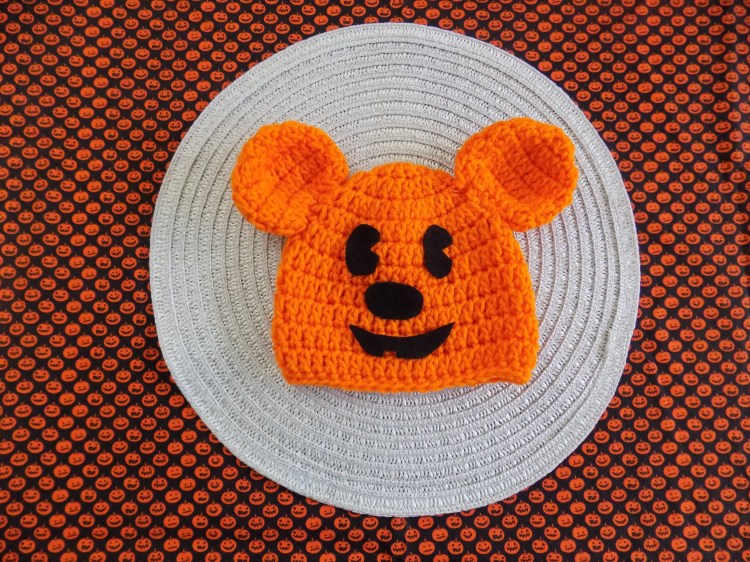
Jack O’Lantern Mickey Mouse
Stitches used:
ch- chain
sc – single crochet
dc – double crochet
2dctog – link 2 dc together
sl st – slip stitch
st – stitch
Using size 4 yarn (worsted or medium weight yarn) with a J-10 (6.0 mm) needle to make a beanie 7” high and 15” flat diameter.
Using ORANGE, Ch 4 and loop to make a magic ring.
Row 1 – ch 2 (this counts as your first dc of this row) and then 11 dc into the ring. Join with sl st to first dc (12 dc)
Row 2 – ch 2 (this counts as your first dc of this row), dc in the same st as joining, and then 2 dc in each stitch all the way around to end. Join with sl st to first dc. (24 dc)
Row 3 – ch 2 (this counts as your first dc of this row), dc in same st as joining, dc in the next st, then repeat {2 dc in the next st, dc in the next st} to the end. Join with sl st to first dc. (36 dc)
Row 4 – ch 2 (this counts as your first dc of this row), dc in same st as joining, dc in the next 3 st, then repeat {2 dc in the next st, dc in the next 4 st, 2 dc in the next st dc in the next 3 st} to the end. Join with sl st to first dc (44 dc).
Row 5 – ch 2 (this counts as your first dc of this row), dc in each st all the way around to the end. Join with sl st to first dc. (44 dc)
Row 6-10 – repeat row 5 (44 dc)
Row 11 – ch 1 (this counts as your first sc of the row), sc in each stitch all the way around to the end. Join with st to the first sc and fasten off. (44 dc)
EARS (make 2)
In ORANGE, Ch 4 and loop to make a magic ring.
Row 1 – ch 2 (this counts as your first dc of this row) and then 11 dc into the ring. Join with sl st to first dc (12 dc)
Row 2 – ch 2 (this counts as your first dc of this row), then repeat {2 dc in the next st} all the way around to the end. Join with sl st to first dc. (24 dc)
Row 3 – ch 2 (this counts as your first dc of this row), dc in each st all the way around to the end. Join with sl st to first dc. (24 dc)
Row 4 – ch 2 (this counts as your first dc of this row), dc in each st all the way around to the end. Join with sl st to first dc. (24 dc)
Row 5 – ch 1 and dc in the next st (this counts as your first 2dctog), then 2dctog all the way around to the end. Join with sl st to the first st, fasten off and leave a long strand for sewing. (12 dc)
Putting it together:
- Cut out face pieces with felt – 2 eyes, a nose, and a mouth (follow picture)
- Glue eyes between rows 4-6
- Glue nose at row 6-8
- Glue mouth at row 9
- Sew ears at rows 3-5
Happy Crocheting! Wear with HOPE and be warmed by LOVE
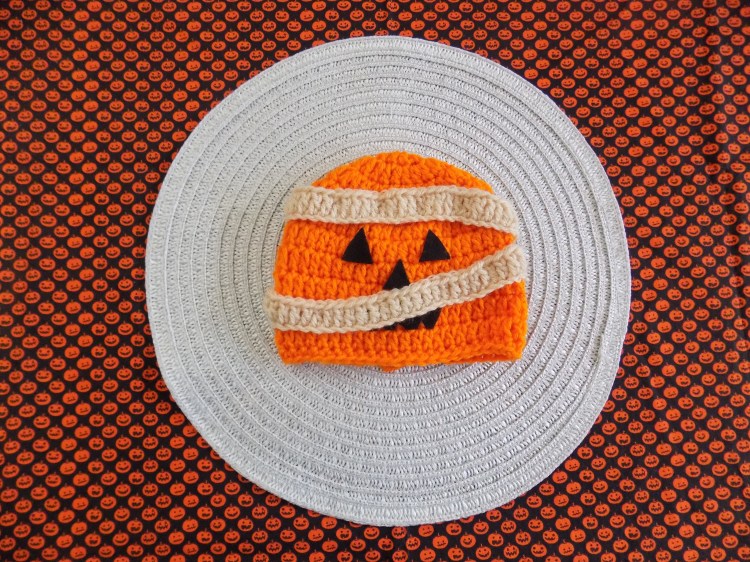
Jack O’Lantern Mummy
Stitches used:
ch- chain
sc – single crochet
dc – double crochet
2dctog – link 2 dc together
sl st – slip stitch
st – stitch
Using size 4 yarn (worsted or medium weight yarn) with a J-10 (6.0 mm) needle to make a beanie 7” high and 15” flat diameter.
Using ORANGE, Ch 4 and loop to make a magic ring.
Row 1 – ch 2 (this counts as your first dc of this row) and then 11 dc into the ring. Join with sl st to first dc (12 dc)
Row 2 – ch 2 (this counts as your first dc of this row), dc in the same st as joining, and then 2 dc in each stitch all the way around to end. Join with sl st to first dc. (24 dc)
Row 3 – ch 2 (this counts as your first dc of this row), dc in same st as joining, dc in the next st, then repeat {2 dc in the next st, dc in the next st} to the end. Join with sl st to first dc. (36 dc)
Row 4 – ch 2 (this counts as your first dc of this row), dc in same st as joining, dc in the next 3 st, then repeat {2 dc in the next st, dc in the next 4 st, 2 dc in the next st dc in the next 3 st} to the end. Join with sl st to first dc (44 dc).
Row 5 – ch 2 (this counts as your first dc of this row), dc in each st all the way around to the end. Join with sl st to first dc. (44 dc)
Row 6-10 – repeat row 5 (44 dc)
Row 11 – ch 1 (this counts as your first sc of the row), sc in each stitch all the way around to the end. Join with st to the first sc and fasten off. (44 dc)
WRAP (make 1)
In BEIGE, ch 100
Row 1 – counting the first 2 ch as your first dc, dc in the 3rd ch from the hook and dc in each ch to the end. Fasten off and leave a long strand for sewing.
Putting it together:
- Cut out face pieces with felt – 3 triangles (for eyes and nose) and a mouth
- Glue eyes between rows 5-6
- Glue nose at row 6
- Glue mouth at row 9
- Sew wrap around face, making sure you expose most but not all of the face.
Happy Crocheting! Wear with HOPE and be warmed by LOVE.
HAPPY HALLOWEEN!
