Normally, we make two different kinds of Thick and Toasty beanies for each pattern – one with size 5 (bulky yarn) and one with size 6 (super bulky yarn). But after working this pattern several times, we found that this pattern works better with the more slender yarn (so a size 5 or thin size 6) for our thick and toasty version!
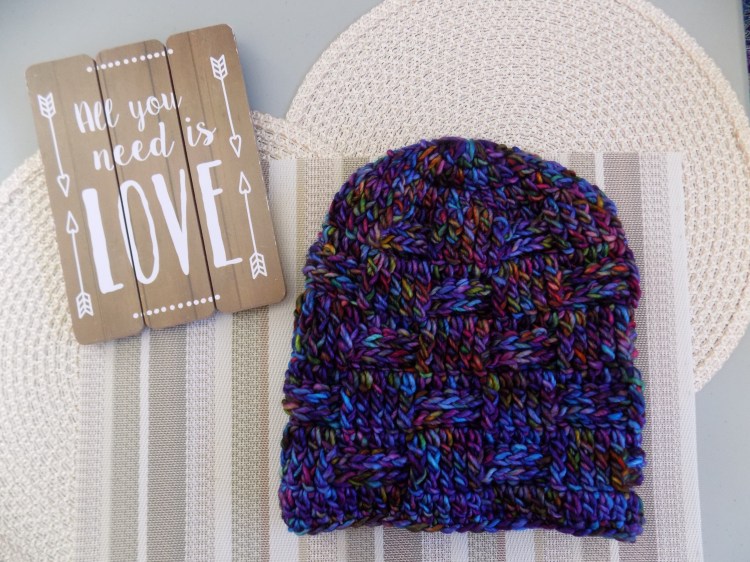
This beanie is made by alternating sets of Front Post Double Crochet and Back Post Double Crochet to create a basket weave look.
Stitches used:
ch- chain
sc – single crochet
dc – double crochet
FPdc – front post double crochet
BPdc – back post double crochet
sl st – slip stitch
st – stitch
Using size 5 yarn (bulky) with a L-11 (8 mm) needle to make a large beanie (20 inch circumference and 9 inch high)
Ch 4 and loop to make a magic ring.
Row 1 – ch 2 (this counts as your first dc of this row) and then 11 dc into the ring. Join with sl st to first dc (12 dc)
Row 2 – ch 2 (this counts as your first dc of this row), dc in the same st as joining, and then 2 dc in each stitch all the way around to end. Join with sl st to first dc. (24 dc)
Row 3 – ch 2 (this counts as your first dc of this row), dc in same st as joining, dc in the next st, then repeat {2 dc in the next st, dc in the next st} to the end. Join with sl st to first dc. (36 dc)
Row 4 – ch 2 (this counts as your first dc of this row), dc in same st as joining, dc in the next 2 st, then repeat {2 dc in the next st, dc in the next 2 st} to the end. Join with sl st to first dc (48 dc)
Row 5 – ch 2 (this counts as your first dc of this row), FPdc in the next 5 stitches, BPdc in the next 5 stitches, then repeat {FPdc in the next 5 stitches, BPdc in the next 5 stitches} all the way around Join with sl st to first dc. (48 dc)
Row 6 – ch 2 (this counts as your first dc of this row), FPdc in the next 5 stitches, BPdc in the next 5 stitches, then repeat {FPdc in the next 5 stitches, BPdc in the next 5 stitches} all the way around. Join with sl st to first dc. (48 dc)
Row 7 – ch 2 (this counts as your first dc of this row), dc in next stitch all the way around. Join with sl st to first dc. Join with sl st to first dc. (48 dc)
Row 8 – ch 2 (this counts as your first dc of this row), BPdc in the next 5 stitches, FPdc in the next 5 stitches, then repeat {BPdc in the next 5 stitches, FPdc in the next 5 stitches} all the way around. Join with sl st to the first dc. (48 dc)
Row 9 – ch 2 (this counts as your first dc of this row), BPdc in the next 5 stitches, FPdc in the next 5 stitches, then repeat {BPdc in the next 5 stitches, FPdc in the next 5 stitches} all the way around. Join with sl st to the first dc. (48 dc)
Row 10 – ch 2 (this counts as your first dc of this row), dc in next stitch all the way around. Join with sl st to first dc. Join with sl st to first dc (48 dc)
Row 11-16 – repeat Rows 5-10 (48 dc)
Row 17 – ch 2 (this counts as your first dc of this row), dc in next stitch all the way around. Join with sl st to first dc. Join with sl st to first dc (48 dc)
Row 18 – ch 1 (this counts as your first sc of the row), sc in each stitch all the way around to the end. Join with st to the first sc and fasten off. (48 dc)
Happy Crocheting! Wear with HOPE and be warmed by LOVE.
