Here is are three beanie patterns using ribs to contour the pumpkin!
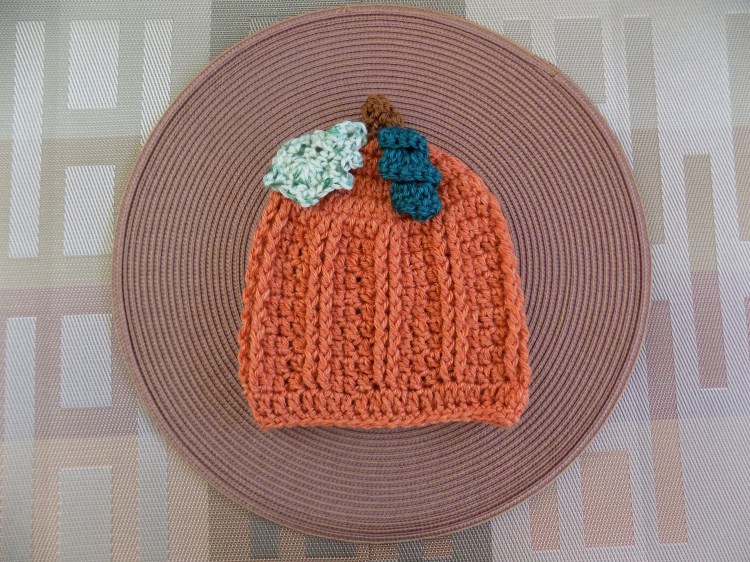
Single Ribbed Beanie

This beanie is made with single ribs down the body of the beanie.
Stitches used:
ch- chain
sc – single crochet
dc – double crochet
hdc – half double crochet
tr – triple crochet
picot st – sc, ch 1, sc in the same st
FPdc – front post double crochet
sk st – skip stitch
sl st – slip stitch
st – stitch
This patterns is made using a size 4 yarn (worsted or medium weight yarn) with a K-10.5 (6.5 mm) needle to create a beanie that is 7.5″ high with a flat diameter of 16″.
BEANIE
In BROWN yarn, Ch 4 and loop to make a magic ring.
Using BROWN yarn, Ch 4 and loop to make a magic ring.
Row 1 – ch 2 (this counts as your first dc of this row), 5 dc into the ring. Join with sl st to the first dc. (6 dc)
Row 2 – ch 2 (this counts as your first dc of this row), and then dc into each st. (6 dc) these two rows are your stalk. CHANGE to ORANGE yarn.
Row 3 – ch 2 (this counts as your first dc of this row, and then 11 dc into the ring of the stalk. Join with sl st to first dc (12 dc)
Row 4 – ch 2 (this counts as your first dc of this row), dc in the same st as joining, and then 2 dc in each stitch all the way around to end. Join with sl st to first dc. (24 dc)
Row 5 – ch 2 (this counts as your first dc of this row), dc in same st as joining, dc in the next st, then repeat {2 dc in the next st, dc in the next st} to the end. Join with sl st to first dc. (36 dc)
Row 6 – ch 2 (this counts as your first dc of this row), dc in same st as joining, dc in the next 3 st, then repeat {2 dc in the next st, dc in the next 4 st, 2 dc in the next st dc in the next 3 st} to the end. Join with sl st to first dc (44 dc)
Row 7 – ch 2 (this counts as your first dc of this row), dc in each st all the way around to the end. Join with sl st to first dc. (44 dc)
Row 8 – ch 2 (this counts as your first dc of this row), dc in the next st, then repeat {FPdc in the next st, dc in the next 3 st} all the way around. (44 st)
Row 9-15 – repeat row 6 (44 st)
Row 16 – ch 2 (this counts as your first dc of this row), dc in same st as joining, dc in each st all the way around. Join with sl st to first dc. (44 dc)
Row 17 – ch 1 (this counts as your first sc of the row), sc in each stitch all the way around to the end. Join with st to the first sc and fasten off. (44 sc)
FLAT LEAF (make 1)
Using LIGHT GREEN yarn, ch 6
Row 1 – counting the first 2 ch as the first dc of this row, 2 dc in the second ch from the hook, hdc in the next 2 ch, 6 dc in the last ch, and now working on the opposite side of the chain, hdc in the next 2 ch, 3 dc in the last ch. Join with sl st to the first dc. (16 st)
Row 2 – ch 2 (this counts as the first sc of this row), sc in the next st, picot in the next st, and then repeat {sc in the next st, picot in the next st} all the way around. Join with sl st to the first sc, fasten off, leaving long tail for sewing. (32 st)
CURLY LEAF (make 1)
Using DARK GREEN yarn, ch 12
Row 1 – counting the first 2 ch as the first dc of this row, 2 dc in the second ch from the hook, then 3 dc into each ch space to the end. Fasten off and leave a long tail for sewing.
Putting it together:
- – Sew both leaves in between Rows 2-3
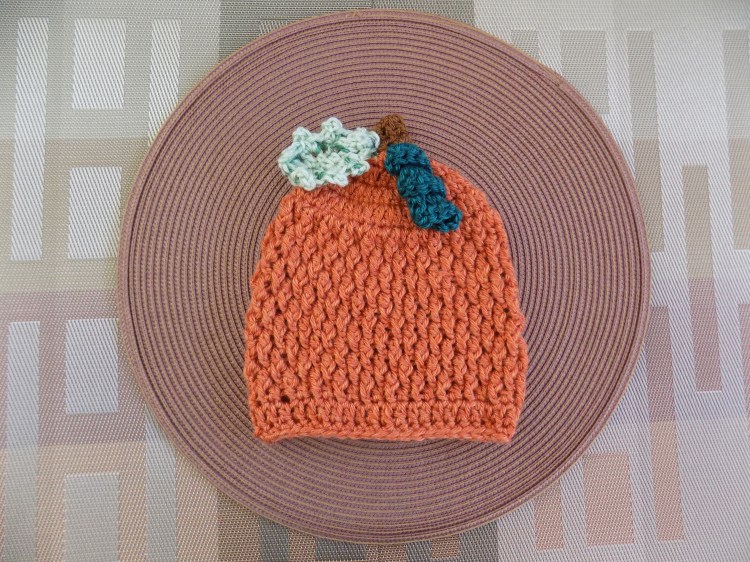
Double Ribbed Pumpkin Beanie
This beanie is made with couplets of ribs down the body of the beanie.
Stitches used:
ch- chain
sc – single crochet
dc – double crochet
hdc – half double crochet
tr – triple crochet
picot st – sc, ch 1, sc in the same st
FPdc – front post double crochet
sk st – skip stitch
sl st – slip stitch
st – stitch
This patterns is made using a size 4 yarn (worsted or medium weight yarn) with a K-10.5 (6.5 mm) needle to create a beanie that is 7.5″ high with a flat diameter of 16″.
BEANIE
In BROWN yarn, Ch 4 and loop to make a magic ring.
Using BROWN yarn, Ch 4 and loop to make a magic ring.
Row 1 – ch 2 (this counts as your first dc of this row), 5 dc into the ring. Join with sl st to the first dc. (6 dc)
Row 2 – ch 2 (this counts as your first dc of this row), and then dc into each st. (6 dc) these two rows are your stalk. CHANGE to ORANGE yarn.
Row 3 – ch 2 (this counts as your first dc of this row, and then 11 dc into the ring of the stalk. Join with sl st to first dc (12 dc)
Row 4 – ch 2 (this counts as your first dc of this row), dc in the same st as joining, and then 2 dc in each stitch all the way around to end. Join with sl st to first dc. (24 dc)
Row 5 – ch 2 (this counts as your first dc of this row), dc in same st as joining, dc in the next st, then repeat {2 dc in the next st, dc in the next st} to the end. Join with sl st to first dc. (36 dc)
Row 6 – ch 2 (this counts as your first dc of this row), dc in same st as joining, dc in the next 3 st, then repeat {2 dc in the next st, dc in the next 4 st, 2 dc in the next st dc in the next 3 st} to the end. Join with sl st to first dc (44 dc)
Row 7 – ch 2 (this counts as your first dc of this row), dc in each st all the way around to the end. Join with sl st to first dc. (44 dc)
Row 8 – ch 2 (this counts as your first dc of this row), dc in the next st, then repeat {FPdc in the next 2 st, dc in the next 3 st} all the way around. (44 st)
Row 9-16 – repeat row 6 (44 st)
Row 17 – ch 2 (this counts as your first dc of this row), dc in same st as joining, dc in each st all the way around. Join with sl st to first dc. (44 dc)
Row 18 – ch 1 (this counts as your first sc of the row), sc in each stitch all the way around to the end. Join with st to the first sc and fasten off. (44 sc)
FLAT LEAF (make 1)
Using LIGHT GREEN yarn, ch 6
Row 1 – counting the first 2 ch as the first dc of this row, 2 dc in the second ch from the hook, hdc in the next 2 ch, 6 dc in the last ch, and now working on the opposite side of the chain, hdc in the next 2 ch, 3 dc in the last ch. Join with sl st to the first dc. (16 st)
Row 2 – ch 2 (this counts as the first sc of this row), sc in the next st, picot in the next st, and then repeat {sc in the next st, picot in the next st} all the way around. Join with sl st to the first sc, fasten off, leaving long tail for sewing. (32 st)
CURLY LEAF (make 1)
Using DARK GREEN yarn, ch 12
Row 1 – counting the first 2 ch as the first dc of this row, 2 dc in the second ch from the hook, then 3 dc into each ch space to the end. Fasten off and leave a long tail for sewing.
Putting it together:
- Sew both leaves in between Rows 2-3
Interloping Ribbed Beanie
This beanie is made with interlocking ribs down the body of the beanie.
Stitches used:
ch- chain
sc – single crochet
dc – double crochet
hdc – half double crochet
tr – triple crochet
picot st – sc, ch 1, sc in the same st
FPdc – front post double crochet
sk st – skip stitch
sl st – slip stitch
st – stitch
This patterns is made using a size 4 yarn (worsted or medium weight yarn) with a K-10.5 (6.5 mm) needle to create a beanie that is 7.5″ high with a flat diameter of 16″.
BEANIE
In BROWN yarn, Ch 4 and loop to make a magic ring.
Using BROWN yarn, Ch 4 and loop to make a magic ring.
Row 1 – ch 2 (this counts as your first dc of this row), 5 dc into the ring. Join with sl st to the first dc. (6 dc)
Row 2 – ch 2 (this counts as your first dc of this row), and then dc into each st. (6 dc) these two rows are your stalk. CHANGE to ORANGE yarn.
Row 3 – ch 2 (this counts as your first dc of this row, and then 11 dc into the ring of the stalk. Join with sl st to first dc (12 dc)
Row 4 – ch 2 (this counts as your first dc of this row), dc in the same st as joining, and then 2 dc in each stitch all the way around to end. Join with sl st to first dc. (24 dc)
Row 5 – ch 2 (this counts as your first dc of this row), dc in same st as joining, dc in the next st, then repeat {2 dc in the next st, dc in the next st} to the end. Join with sl st to first dc. (36 dc)
Row 6 – ch 2 (this counts as your first dc of this row), dc in same st as joining, dc in the next 3 st, then repeat {2 dc in the next st, dc in the next 4 st, 2 dc in the next st dc in the next 3 st} to the end. Join with sl st to first dc (44 dc)
Row 7 – ch 2 (this counts as your first dc of this row), dc in each st all the way around to the end. Join with sl st to first dc. (44 dc)
Row 8 – ch 2 (this counts as your first dc of this row), dc in the next st, then repeat {FPdc in the next st, dc in the next st} all the way around. (44 st)
Row 9 – ch 2 (this counts as your first dc of this row), FPdc in the next st, then repeat {dc in the next st, FPdc in the next st} all the way around. (44 st)
Row 10 – 17 – repeat row 6 (44 st)
Row 18 – ch 2 (this counts as your first dc of this row), dc in same st as joining, dc in each st all the way around. Join with sl st to first dc. (44 dc)
Row 19 – ch 1 (this counts as your first sc of the row), sc in each stitch all the way around to the end. Join with st to the first sc and fasten off. (44 sc)
FLAT LEAF (make 1)
Using LIGHT GREEN yarn, ch 6
Row 1 – counting the first 2 ch as the first dc of this row, 2 dc in the second ch from the hook, hdc in the next 2 ch, 6 dc in the last ch, and now working on the opposite side of the chain, hdc in the next 2 ch, 3 dc in the last ch. Join with sl st to the first dc. (16 st)
Row 2 – ch 2 (this counts as the first sc of this row), sc in the next st, picot in the next st, and then repeat {sc in the next st, picot in the next st} all the way around. Join with sl st to the first sc, fasten off, leaving long tail for sewing. (32 st)
CURLY LEAF (make 1)
Using DARK GREEN yarn, ch 12
Row 1 – counting the first 2 ch as the first dc of this row, 2 dc in the second ch from the hook, then 3 dc into each ch space to the end. Fasten off and leave a long tail for sewing.
Putting it together:
- Sew both leaves in between Rows 2-3
Happy Crocheting! Wear with HOPE and be warmed by LOVE.
